

Since getting serious with my landscape photography back in January 2013 there have always been a few niggling questions which I have repeatedly asked myself and one such question is "why do so many Landscape Photographers decline to remove Chromatic Aberration from their images?"
I just cannot understand why I see so many landscape images being produced that contain Chromatic Aberration. For me, removing chromatic aberration is just one of many essential and fundamental actions that needs to be applied to almost every single landscape image during the development or post-processing phase. Just like straightening a bent/crooked horizon or sharpening an image, removing chromatic aberration just simply needs to be done!
Now while it is true that there are times when you cannot remove every trace of chromatic aberration from an image, you can certainly reduce it to the point where it is no longer really as blatantly noticeable.
It can be very frustrating to see images containing such obvious evidence of chromatic aberration because of the fact that it is actually so simple and quick to remove it. In Adobe Lightroom it is literally a one-click action!!
What is Chromatic Aberration?
OK, so let's start off by understanding what exactly chromatic aberration is. Chromatic Aberration, also known as “color fringing” is a common optical problem that affects many lenses. Some lenses are more affected than others and thus the evidence of chromatic aberration will be much more apparent in the resulting image. When chromatic aberration is present in an image you will notice colored edges (red, green, blue, yellow, purple, magenta) appearing around objects, especially in high-contrast situations such as the lighting conditions that are often present at dawn/sunrise and sunset/twilight.
Instead of diving into all of the scientific and lengthy definitions of chromatic aberration, the following image will give you a clear idea of what exactly chromatic aberration is and what it looks like:
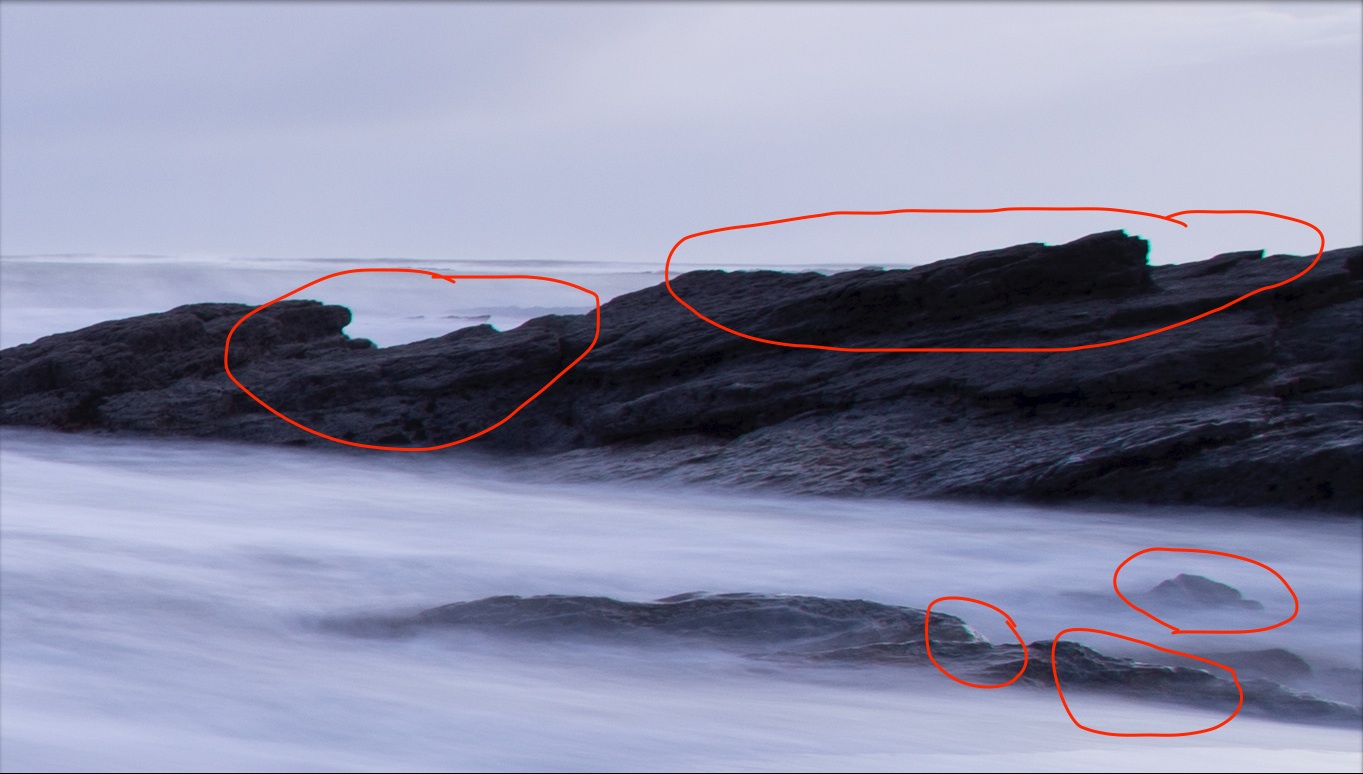
Here, you can see the obvious evidence of chromatic aberration around the edges of the rocks
What is the problem with having chromatic aberration in images?
This is a simple question to answer.
Chromatic aberration sticks out like a sore thumb most of the time, it looks really ugly and can often ruin an otherwise great image and goes to highlight either (1) the lack of education/skills on the part of the photographer, (2) the lack of attention to detail on the part of the photographer or (3) laziness on the part of the photographer.
Honestly, with the availability of so many great processing software options today and the fact that the process to remove chromatic aberration is so quick and simple, there really is no excuse for not removing it.
So why do photographers produce images containing chromatic aberration?
Well, I highlighted above that the presence of chromatic aberration in images can often indicate the following about the photographer:
- Lack of education/skills on the part of the photographer
- Lack of attention to detail on the part of the photographer
- Laziness on the part of the photographer
The first one is obviously understandable, forgivable and actually easily fixed. I mean, we all start off in our photographic journeys with a massive learning curve ahead of us, right?
And being able to identify and remove chromatic aberration is definitely something that is present on this learning curve. It is something that we all simply need to learn and then enforce in our own photographic mindsets as we progress on our journeys.
It is only par for the course that when we put our images up on Facebook or on other social media outlets that all of our non-photographer friends (who don't have a clue about photography anyway!) will click the "Like" button and give us a "pat-on-the-back" and we feel good about ourselves.
But the problem really begins when our photographer friends or other photographers that we know start "Liking" our images on Facebook and providing lovely comments that make us all feel great about ourselves but yet they neglect to tell us and point out the very obvious flaws within our images, such as the horizon being off-tilt, the highlights being blown out or the presence of some hideous chromatic aberration in our images. Why does this happen? Because most people these days are too afraid to point out the flaws in other peoples "art" for fear of upsetting the individual.
If you are an experienced and skillful photographer and you have photographer friends who are new to the photography game and are only starting off on their photographic journey then do them a massive favour and DO point out their technical flaws and shortcomings in their images to them. It is always the responsibility of the "Master" to point out the shortcomings in the skills of the "Apprentice". As Master Yoda would say "correctly train them, you shall do!!" Constructive criticism is actually one of the best ways for new photographers to see and understand their mistakes and thus being able to improve and grow in their photographic skills, knowledge and abilities. Believe me when I say that your novice photographer friends will actually thank you for it in the long run.
The second and third causes are much harder to fix and no words of mine here will be able to fix it....sometimes people just need a good kick in order to stop being lazy and to pay more attention!
How to easily and quickly remove chromatic aberration in Adobe Lightroom
As mentioned earlier, the process of removing the hideous and unsightly chromatic aberration in Lightroom is literally a one-click action and here is how you can do it.

Lens Corrections tab in Lightroom Develop module
- In Lightroom go to the Develop module
- Click on Lens Corrections
- Click on Color
- Check the "Remove Chromatic Aberration" checkbox
- And you are done!!
See how quick and easy that was?
These simple steps will successfully remove the majority of the chromatic aberration from your images most of the time.
On some occasions you may need to apply further tweaks to the sliders in order to clean up the image a little more but for me, a simple enabling of this feature will do the job for you 99% of the time.
You can also do the same thing using Adobe Photoshop and other processing software applications.
To illustrate exactly just how good of a job this feature does at removing chromatic aberration from your images, below is a comparison of a zoomed in portion of one of my images showing the before and after effects of this amazing little feature

Here, you can see the obvious evidence of chromatic aberration around the edges of the rocks

Here you can see the chromatic aberration has been successfully removed within Adobe Lightroom
Well, I hoped this blog post will not only help you personally to grow and progress your photography to the next level but also that it might help to improve the quality and production standards across all other landscape photographers also!
If you want to stay updated with my latest blog posts and latest image posts, head on over to my Facebook page and click "Like". Remember to hover your mouse over the "Liked" button and select "Get Notifications" as well.
Also, subscribe to my YouTube Channel in order to stay updated with my latest video tutorials and other photography related videos.